

Over the last 2 years, I have compiled (And a few friends) a lot of information on JTAGs & RGHs. I will be sharing with you today, not on how to RGH & JTAG, but tutorials on what to do with them.

- Introduction
- Dev Kit Guide
- FSD Set Up
- Emulators
- Themes For Freestyle Dash
- How to Flash Xbox
- PS3 Console Modding
- Jailbreaking
- Downgrading
- Backups
- Credits

What are RGHs & JTAGs? They are modified consoles used to get free items &
or games from the marketplace, also so you can download any game off the internet and burn it to an disk
and play on your console for free. You can also, host 'lobbies' for many COD, Halo, GTA games, etc...
or games from the marketplace, also so you can download any game off the internet and burn it to an disk
and play on your console for free. You can also, host 'lobbies' for many COD, Halo, GTA games, etc...

Motherboards
Xbox Development Kits (XDK's),like normal Xbox 360,have motherboards.
First off, if you do not know what a motherboard is, read this;
Code:
A motherboard is a circuit board which is in many computers and electronic items (such as an Xbox 360)
It holds many of the crucial components of the system,it also provides connectors for other peripherals such as the HDD on an Xbox 360.

The motherboard is also known as:

Main Board
System Board
Mobo
Like all other consoles it's motherboard will vary.
Here is a list of the motherboards:
- Xenon (2005)
- Zephyr (2007)
- Falcon (2007)
- Opus (2008)
- Jasper (2008)
- Valhalla/Vajle (2010)
The type of motherboard does not affect what the XDK can do. However, their are different types of XDK's, which I will explain later in the guide. Here are the advantages and disadvantages of each XDK motherboard.
Xenon
Code:
- Cheapest Motherboard.
- Most prone to the Red Ring of Dead.(RROD)
- It being so old, a lot of these consoles have been banned from Pnet.
- Does not have HDMI.
- Most likely to break due to age/heat problems.
- Oldest type of Motherboard. (2005 motherboard).
Zypher
Code:
- Exact same as Xenon besides one change.
- Has HDMI.
- Second motherboard to be released (2007)
Falcon
Code:
- Has HDMI.
- Less prone to getting RROD.
- Heats up slower than Xenon,lowering chance of RROD.
- Not as old as xenon but not as new as Jasper or Valhalla.
- Some consoles may be banned from Pnet.
Opus
Code:
- Exact same as a Falcon besides one change.
- Does not have HDMI.
- Released 2008, but still as reliable as a Falcon.
- Little is known about them as they are rare.
Jasper
Code:
- Has HDMI.
- Has internal memory of either 256mbs or 512mbs.
- RROD is practically unknown.
- Usually not banned from Pnet as they are still used by Developers.
- Does not suffer heating up problems.
- More expensive as it is more efficient and newer.
- Second newest motherboard for XDK's.
Valhalla
Code:
- Newest motherboard (2010)
- Also known as "Vejle" motherboard.
- Very rare to be found as they are brand new, making them extremely expensive.
- Enjoys all the same perks as the Jasper.
- Even lower chance of RROD than Jaspers and much quieter.
- This motherboard is exclusive to the Xbox 360 Slim styled XDK's.
What is an XDK?
An Xbox Development Kit is a special type of Xbox 360 console produced by Microsoft. They are sold to official Microsoft developers so that they can develop content for the Xbox 360 console. They, are like Jtags, they can run unsigned code, but they are intended to be able to do this from production.
They come in four different types;
- Demo Kit
- Review Kit
- Test Kit
- Development Kit
Each of these is described in detail to an extent later in the guide. They are not able to connect to Xbox Live. However, they do have access to a different community, called Pnet.
More information is available on Pnet later in the guide.
As they have been intended to be used by developers, there is virtually no use for buying an XDK unless you are an experienced and a very good programmer/coder. If you are only looking to have fun with modding and making Call of Duty patches, you have no business buying one of these.
XDK's are very expensive compared to Jtags, this is mainly due to the fact that they are rare as Microsoft does not allow them to be released to the public, but a few have slipped through and some people own them. A lot of illegal homebrew has been created using XDK's, and a lot of this homebrew is used on Jtagged consoles, the XDK's are practically essential for developing content for Jtags.
Types of XDK'S
Here I will go into a brief description of what each of these XDK's can do.
I will start off with the simplest one, the "Demo Kit".
Demo Kit
Code:
- The "Demo Kit" allows you to play Xbox 360 games that are still under development and are yet to be officially released to the general public.
- The "Demo Kit" does not support DVD Emuation, making it not as useful for developers who need to debug and edit their game.
- These types of Kits are best used for presentation of a game in development, for expample, at E3 or other trade shows.
- They can run unsigned code and have access to Pnet.
Reviewer Kit
Code:
- These kits are usually sent to reviewers for magazines and/or websites etc.
- They can run unsigned code and can also use a sidecar.
- They do not have all the functions as a Development Kit, as these are intended to be used by reviewers.
- They come with a moderate sized HDD.
Test Kit
Code:
- This type of Kit is intended to be used by game designers, artists and game testers.
- The test console does support DVD Emulation the same as the "Demo Kit" does, allowing the owner to debug there games from there computer HDD without needing to install the game to their XDK HDD.
- These usually come with a large HDD.
- Some of these kits may come with a sidecar, others may not.
Development Kit
Code:
- The Development Kit has the hardware and the software to allow you to completely develop and release an Xbox 360 game, assuming you know how to make one.
- It allows you to debug games using Visual Studio and you can also use PIX to analyse the games' performance.
- Needs a sidecar attached to fully function as a Development Kit, although it is not necessary to have in order to use it.
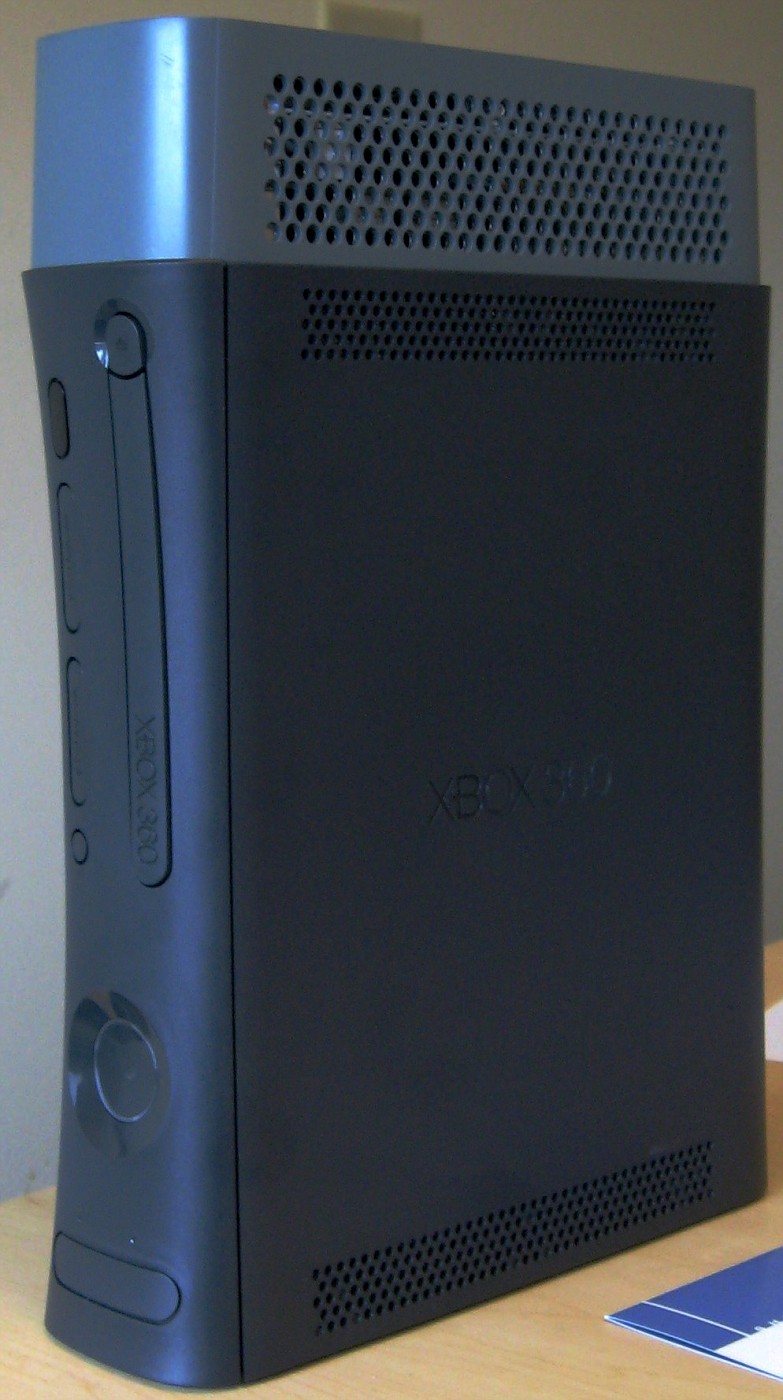
- Without a sidecar it you will not be able to use it's extra functions.How to Tell the Difference Between XDK'S
White consoles usually are Demo Kits or Test Kits.
While Grey/Black consoles are usually Development Kits or Reviewer Kits.
Demo/Test Kit Picture
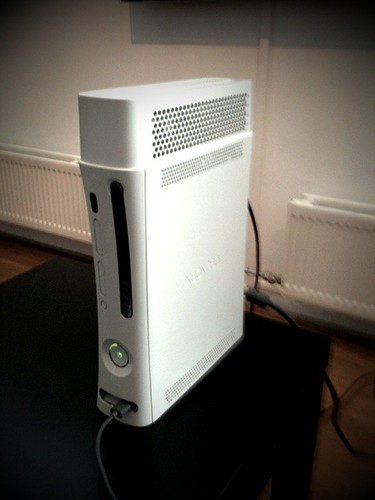
Development/Reviewer Kit Picture
What is A Sidecar?
A sidecar is a big box like shape on top of the Kit. (as shown in the pictures) They either have one,or two USB ports on the back of them, each has their own use.
Whether they have one or two USB slots varies depending on what type of XDK you have and what console the sidecar was intended to be used with. Sidecars also makes Kernel Debugging much easier to do.
Please Note:
If you don't use a sidecar with a kit, you can use a standard power supply with it.
However, if you do use a sidecar you need a different type of power supply.
You need a 213W Power supply for it to work correctly.
Sidecar USB Ports
As stated above, a sidecar will either have one,or two USB ports. These both serve different functions, and yes, two is better than one but is more expensive as a result. Usually you will find 2 USB's on a sidecar intended for a Development Kit. If the sidecar has one USB port, that USB is used for DVD Emulation.
If the sidecar has two USB ports, the first one will be used for DVD Emulation and the second one will be used for PIX. Now I am sure you will be wondering what these two things are, so here is a brief explanation of each below.
What is DVD Emulation?
DVD Emulation allows you to play or debug games that are a work in project directly from your computers hard drive without the need to transfer the game onto the Kit.
What is PIX?
PIX (Performance Investigator for Xbox) basically allows you to see your CPU output.
What is Pnet?
Pnet is "Partner Net".
Pnet is like Xbox Live, but for XKD's only and it is also completely free.
XDK's cannot access Xbox Live at all.
However, they can connect to Pnet, where they can play games online and access free download for upcoming game content and current game comment.
Yes I said upcoming game content, developers sometimes released DLC to Pnet first so it can be tested out and then find glitches and fix them before they release it onto Xbox Live for the General Public to access and download.
Some XDK's may be flagged by Microsoft, and will be stopped from connecting to Pnet.
This usually happens when an XDK travels a long distances and Microsoft notices, what I mean by this is if it was in use in the United States and was sold to someone in Europe, if they notice the huge change in location,they may decided to flag it.
It would be good to take into account that Pnet has no where near the amount of users as Xbox Live has, actually it is substantially less users than Xbox Live, but that should be pretty obvious due to the fact that XDK's are not intended to be used by the public.
Movies and other media are not available sadly, but all content available is completely free to download.
Please note that Pnet does not hold downloads for long periods of time like Xbox Live, you may only download items that have been added recently.
XDK Uses
XDK's have quite a few uses.
However, you should not consider buying one unless you fit into one or more of these categories.
- A professional programmer/coder
- Very rich with money to waste
- A skilled programmer/coder
If you are not one of these, you should not be looking to buy one. As you can guess by there name, they are Xbox 360 Development Kits. They can develop Xbox 360 games and are able to test the game projects out allowing you to test them for any issues they may have and then you have to return to coding them to attempt the fix the problem.
They can also run unsigned code,which is pretty obvious. They can save games to the HDD and run them without the disk. (Please note the games have to be patched on a computer first) Using Pnet,you can play un-release and un-finished games that have been uploaded to Pnet by their Developers.
You can change to any desired motherboard as long as you have the recovery for it. This means you can be on Kinect Dash, and then downgrade to an older dash board without blowing your efuses and bricking your console. HDD's are not locked to a console, allowing them to be any size.
Play Homebrew.
Backup games to your computer for safety. They are multi-region, meaning all types of games work, European, American, Japaneses etc.
Take screenshots or videos of your gameplay.
WARNINGS
If your XDK gets any errors or RROD, you have to fix it yourself, it is not under warranty and cannot be sent to Microsoft.
They are very expensive to buy, and like Jtags, the newer the motherboard, the more expensive the cost. Not all patched games will play on an XDK.
FAQ's
Q. Can you make accounts preloaded with MS Points?
A. I've heard about a "hack" allowing you to,but I am not sure and know nothing about this "hack".
Q. Can I get free XBL accounts using a Dev Kit?
A. This answer is the same as the Q. above.
Q. What should I get,Jtag or Dev Kit?
A. Expert Coded = Dev Kit, Fun Mods = Jtag.
Q. How much do they cost?
A. The prices vary depending on the seller.
Q. Are they illegal?
A. I think they are if you are not the registered developer (owner).
Q. Can they run homebrew like a Jtag?
A. They can run unsigned code,so I would assume so.
Q. Can I host XBL lobbies with these?
A. *Facepalm* No,you cannot connect to XBL.
Q. What is a "Recovery"?
A. It is the dash board version on an XDK.
It is the equivalent of the Kernel of a retail Xbox 360.
Q. How to put a Recovery on an XDK?
A. Either put the ISO onto the console or send it over a network connection.
Q. Can I downgrade my Recovery without blowing efuses?
A. Yes you can,just install the desired Recovery and you are good to go.
Please look to the next post for FSD Set-Up Guide.

How to Install FSD
Go here and download which ever version you would like and put it where it tells you on that page.
Step one: Run the Installer, I used the LIVE Package so it'll be under quick play for me in NXE.

Step two: Configure your settings inside the installer (my pictures is a little off because I'm using HDMI and it doesn't support HDMI very well...)

Step three: Hit start.

After a few minutes-

Step four: Hit continue and it will prompt you to install dashlaunch, I can't show you take as I already have the newest version built into my nand:/
Step five: Enjoy FreeStyleDash on your console:3

How to Set Up Game Paths
Before-

Step one: Go to Settings>Content Settings>Manage Game Paths

Step two: To set up a new Game Path Press "Y" while in that menu.

Step three: Hit Change Path, and choose the directory you would like to search with-in for content by pressing "Y".
(I am going to use root of HDD1)

Step four: Edit what you are searching for and the intensity of said search.

Step five: Save new Game Path.

Step six: Hit "B" and go to Scan Settings and hit Start manual scan(Click in right trigger to see if it's checking paths.)

Step seven: Go to the main tab and go to games and all of them should be there if done correctly.
After-

How to Install Cover Art in FSD
Step one: Start off by going to http://covers.jqe360.com/ and sign up for an account.
Step two: Sign in with the account in FSD.

Step three: Find the game you want cover art for and search for in on JQE360.com
Step four: Click Install to Xbox.
Step five: Press "Y" over the game and hit "Refresh Artwork".
Step six: Restart Console after a couple of minutes.
Step seven: Enjoy the cover art on your games
")
How to Customize the Default Theme
Step one: Got to set up tab and then click Skins.
Step two: Hit "X" to open the Cusomize Skin menu.
Step three: You can change your background and stage from this menu.
Step four: Now press "Y" to enter edit mode. In edit mode you can make changes to individual tabs, whole sections, or the whole dash.
Step five: Press "A" on the tab you want to edit. You can edit Background color, Icon Color, Text Color, and Refection color.
Step six: Then press "X" to save those tab changes.
Step seven: Now you can either edit each individual tab, or apply the that menu or whole dash.
Step eight: Press the start button to save your changes.
Step nine: Now press "X" to Save changes and Return.
Step ten: Enjoy your now customized dash!
How to Install TU's with FSD
Yet another really simple tutorial that many people don't know they can do in FSD.
Make sure you're connected to your router or whatever, you just need internet access on the console.
In FSD go into the "Games" section and then find the game you want TU's for and press "Y"
then go down to "Manage Title Updates"
Go into the "Manage Title Updates" menu and press "Y" again, it should ask where you want to save them, then automatically start downloading them.
Then give it a little bit while it downloads them.
And Whalaa, You got that TU Swag.
Please look to the next post for Emulators.

Arcade / NES / GB / GBC / GBA / Sega Genesis / Game Gear / Master System / DOOM / PCE / WS:
Code:
Download: http://www.mediafire.com/?x77dsts137qbjkg

Features:
- Real-time rewinding
- Switching between emulator cores seamlessly, and ability to install
new libretro cores
- Clean GUI

Emulators:
- Final Burn Alpha (Arcade - various) [version 0.2.97.26]
- FCEUmm (Nintendo Entertainment System) [recent SVN version]
- Gambatte (Game Boy | Super Game Boy | Game Boy Color) [version 0.5.0 WIP]
- Genesis Plus GX (Sega SG-1000 | Master System | Game Gear | Genesis/Mega Drive |
Sega CD) [version 1.7.0]
- SNES9x Next (Super Nintendo/Super Famicom)
- VBA Next (Game Boy Advance)
- Prboom (for playing Doom 1/Doom 2/Ultimate Doom/Final Doom)
- Mednafen PCE Fast (PC Engine/PC Engine CD/Turbografx 16)
- Mednafen Wonderswan (WonderSwan/WonderSwan Color/WonderSwan Crystal)

All of the emulators listed above are the latest versions currently
available. Most of them have been specifically optimized so that
they will run better on 360 (some games would not reach fullspeed
without these optimizations).
Step one: Download file
Step two: Extract
Step three: Plugin HDD

Step four: Put RetroArch into Emulator folder

Step five: Download ROM files

ROM file extensions supported:
Code:
- Prboom WAD|wad
- SNES9x Next smc|fig|sfc|gd3|gd7|dx2|bsx|swc|zip|SMC|FIG|SFC|BS X|GD3|
GD7|DX2|SWC
- Genesis Plus GX md|smd|bin|gen|zip|MD|SMD|bin|GEN|ZIP|sms|SMS|gg|G G|sg|SG|
cue|CUE
- VBA Next GBA|gba
- FCEUmm nes|NES|unif|UNIF
- Gambatte gb|gbc|dmg|zip|GB|GBC|DMG|ZIP
- Final Burn Alpha zip|ZIP
- Mednafen PCE pce|PCE|cue|CUE
- Mednafen Wonderswan ws|WS|wsc|WSC
Step six: Put ROM's in roms folder

Step seven: Plug HDD into JTAG and navigate to XeXmenu

Step eight: Launch the default.xex inside the RetroArch folder

Step nine: Select 'Change Libretro Core'

Step ten: Select the .xex of the emulator you want to use

Step eleven: Select 'ROM Browser'

Step twelve: Select 'roms'

Step thirteen: Select your ROM file

Step fourteen: PLAY DEM GAMEZ

Extra In-Game Controls:
Code:
During ingame operation you can do some extra actions:

Right Thumb Stick - Down - Fast-forwards the game
Right Thumb Stick - Up - Rewinds the game in real-time
('Rewind' has to be enabled in the
'Settings' screen - warning - comes at a
performance decrease but will be worth it
if you love this feature)
RStick Left + RT - Decrease save state slot
Rtick Right + RT - Increase save state slot
RStick Up + RT - Load selected save state slot
RStick Down + RT - Save selected save state slot
Right Thumb + Left Thumb - Go back to 'Menu'/'Quick Menu'
N64 / PSX / PS1:
Step one: Download this: Emulators.zip
Step two: Unzip the file in a new folder where you can easily find it.
Step three: Find a memory stick that is 4GB or less.
Step four: Remove anything you want from the memory stick and format it to FAT32:
Then have these options:
Step five: Click 'start' and wait for it to finish.
Step six: Move the files inside the .zip folder onto your USB so it looks like this:
Code:
You can place the game files inside
X:\- Nintendo 64 Emulator\- Games\ (For N64 games) ([b]Can[/b] be .zip format)
X:\-PlayStation Emulator\- Games\ (For PSX games) ([b]Cannot[/b] be .zip format)
(Note: All Ps1 roms should have their file extension renamed to .cdrcimg) I have no idea why it just greatly increases the compatibility.
(X being your memory stick's drive letter)

(I'm not going to tell you where to get the game files - you could easily find them by going on Google.)
Step seven: Plug the memory stick into one of the front ports of your JTAG/RGH.
Step eight: Boot into Xell by pressing the eject button to turn on the console.
Step nine: Wait for it to load....
Step ten: Select either the xenon.elf in the PlayStation folder or the xenon.elf inside the Nintendo 64 folder, depending on what you want to play.
Step eleven: Select the game files inside the appropriate game folder.
Step twelve: Have fun playing the games of your childhood :thumbsup:
DS
Download: DS.zip
(Heads up, this runs like shit - Js)
Step one: Download
Step two: Extract
Step three: Plug in your HDD and place 'DS' the folder in your 'Emulators' folder
Step four: Download your ROMs
Step five: Place your ROM's inside the 'roms' folder
Step six: Plug your HDD back into your RGH/JTAG and boot up XeX menu
Step seven: Navigate to the DS folder and launch the DSon360.xex inside
Step eight: Pick you ROM file
Step nine: Play them games!
Please look to the next post for Themes for Freestyle Dash Guide.

This guide will show you how to download and install new custom themes for Freestyle Dash.
Customizable Popular Themes:
Freestyle Dash 3.0 Themes:
Ayr v1.03 (WIP) (Moving Icons!)


Download: http://www.mediafire.com/?57756t66g467j7e
Font Download: http://www.mediafire.com/?c71s3ncqm323mjm
(The font is required for the theme to work correctly)
Dark 2.0:


Blackened Blue Premium:
Freestyle Dash 2.2 Themes:
MetroStyle:
Blackened Radial:
Blackened Red/Blue/Green: (Blue is shown)
http://i.imgur.com/HfSkUs.png?1
http://i.imgur.com/WqRdd.jpg?1
Downloads:
Red- BR725Listmod.rar
Blue - BB725Listmod.rar
Green - BG725Listmod.rar
http://i.imgur.com/WqRdd.jpg?1
Downloads:
Red- BR725Listmod.rar
Blue - BB725Listmod.rar
Green - BG725Listmod.rar
How to install:
Step one: Download the theme you want
Step two: Extract it using Winrar
Step three: Place it inside you FSD Skins folder eg - .../Frestyle/Skins/
Step four: Go onto the themes section on FSD
Step five: Select a theme
Step six: Select Reboot now
Please look to the next post on How to Flash your Xbox Guide.

This guide will teach you how to flash your own Xbox 360 Console.
Requirements
- x360USB Pro
- A DVD Drive Power Source (I suggest an Xecuter CK3 Lite or an CK3 Pro)
- CK3 Probe III (LiteOn Only)
- Sata Cable (Supplied with x360USB Pro)
- USB Cable (Supplied with X360USB Pro)
- Latest version of Jungle Flasher 1.85
- Latest version of X360USB PRO firmware (must be at least v18)
- X360USB PRO Windows Drivers (Download)
- Windows XP / Vista / 7 - 32bit or 64bit
- Molex Power supply
- iXtreme LT 1.9
- Philips head screwdriver (LiteOn Only)
- Torx screwdriver 8~10
- Flat head screwdriver
- [Optional] Jungle Flasher Tutorial 4.1b
Flashing LiteOn
Step one: Open the Xbox 360
[video=youtube]http://www.youtube.com/watch?v=Uj2A7mGGjuY[/video]
Step two: Unplug the SATA and power cables to remove the DVD drive from the Xbox 360
Step three: Flip it upside-down, remove the warranty sticker and take a Philips head screwdriver and unscrew the screw to take the casing off.

Step four: Connect the Probe III to your CK3 Lite/Pro.
Step five: Insert the power cable from the CK3 Lite/Pro into the DVD drive. -It should be showing RED cables, because the drive is upside-down.
Step six: Now plug in one end of the SATA cable to the DVD drive and the other end to your X360USB Pro.
Step seven: Next your going to connect the USB cable to the X360USB Pro to your computer you are using to flash.
Step eight: Before going to the computer you want to power the CK3 Lite/Pro using a Molex Power supply. The GREEN cables should be facing up.
Step nine: Open up Jungle Flasher v0.1.83b, and go to the "DVDKey 32" and select "PhatKey".
Step ten: Go back to your drive using the Probe III. While hovering over point MPX01, turn off the drive by pressing down on the Probe III switch and quickly probe the point, MPX01, when you have the Probe III on the point let go of the switch and Jungle Flasher should go Status 52. You can now put the Probe aside.
Step eleven: You'll get a pop-up message saying "Extract Complete!", you'll then want to save all six keys somewhere safe.
Step twelve: It'll want ask to auto-load LT 1.9, click "Yes". You should then make sure the drive keys are the same. (DVDKey 32 and iXtreme LT 1.9)
Step thirteen: If they match, you can continue to the "MTK Flash 32" tab, and selecting "LiteOn Erase" from the 360 Tools area.
Step fourteen: Confirm "Yes", and "Yes" again, and quickly power the drive off and on, ONE time. You should get status (0x0), and you will see the flash properties.
Step fifteen: If Step 13 was done correctly you can continue, click "Write" on the same tab (MTK Flash 32).
Step sixteen: It will then give you the status "Writing target buffer to flash", once successful it will automatically do a verification test. And once it's verified you'll get the status message "Write verified OK !".
Step seventeen: Finally, click "Outro / ATA Reset" to finish. ~Congratulations! You've just Flashed your Xbox 360 Console!
Flashing BenQ
Step one: Open the Xbox 360
[video=youtube]http://www.youtube.com/watch?v=Uj2A7mGGjuY[/video]
Step two: Unplug the SATA and power cables to remove the DVD drive from the Xbox 360
Step three: Connect the Power cable to your CK3 Lite/Pro.(Probe will not be used on this drive)
Step four: Insert the power cable from the CK3 Lite/Pro into the DVD drive. RED should be facing up.
Step five: Now plug in one end of the SATA cable to the DVD drive and the other end to your X360USB Pro.
Step six: Next your going to connect the USB cable to the X360USB Pro to your computer you are using to flash.
Step seven: Before going to the computer you want to power the CK3 Lite/Pro using a Molex Power supply. The GREEN cables should be facing up.
Step eight: Open up Jungle Flasher v0.1.83b, and go to the "MTK Flash 32" Tab.
Step nine: Click on BenQ Unlock.
Step ten: Then Click Read.
Step eleven: Let it do its thing and when its done it will ask you to save (I recommend saving the Key for safe keeping)
Step twelve: It'll ask to auto-load LT 1.9, click "Yes". You should then make sure the drive keys are the same. (Be sure to have LT 1.9 in the Firmware folder of Jungle Flasher or it won't load.)
Step thirteen: If they match, you can continue to the "MTK Flash 32" tab, and selecting "Write" from the Flashing Tasks area. (Be sure to have the Phat bubble selected).
Step fourteen: It will start writing the CFW.
Step fifteen: It will then give you the status "Writing target buffer to flash", once successful it will automatically do a verification test. And once it's verified you'll get the status message "Write verified OK !". ( Its fine if your verification fails).
Step sixteen: Finally, click "Outro / ATA Reset" to finish. ~Congratulations! You've just Flashed your Xbox 360 Console!
Flashing Samsung
Step one: Open the Xbox 360
[video=youtube]http://www.youtube.com/watch?v=Uj2A7mGGjuY[/video]
Step two: Unplug the SATA and power cables to remove the DVD drive from the Xbox 360
Step three: Connect the power cable to your CK3 Lite/Pro.
Step four: Insert the power cable from the CK3 Lite/Pro into the DVD drive. RED should be facing up.
Step five: Now plug in one end of the SATA cable to the DVD drive and the other end to your X360USB Pro.
Step six: Next your going to connect the USB cable to the X360USB Pro to your computer you are using to flash.
Step seven: Before going to the computer you want to power the CK3 Lite/Pro using a Molex Power supply. The GREEN cables should be facing up.
Step eight: Open up Jungle Flasher v0.1.83b, and go to the "MTK Flash 32" Tab.
Step nine: Click on Sammy Unlock.
Step ten: You will be shown a message warning you that Sammy Unlock only works on stock drives & drives with iX LT firmware and how to unlock if using (i)Xtreme.
Step eleven: Check the Flash Properties box for status code 0x70, if so, your flash was good.
Step twelve: Click "Read", it will read the firmware on the drive. Once done, it will prompt you to save, say "Yes." After saving it will give you a message to auto-load iXtreme LT 1.9, click "Yes" again. (You must have the firmware pack inside Jungle Flasher's firmware folder.)
Step thirteen: Make sure the keys match, and click "Save to file."
Step fourteen: Now go back to the "MTK Flash 32" tab and click "Write", it should then start to flash the drive, and soon after verify what it just wrote. At the end of the writing process you should see "Write verified OK !"
Step fifteen: ~Congratulations! You've just Flashed your Samsung Xbox 360 Console!
Please look to the next post for PS3 console Modding.

I have made this thread so people in this section will stop making spam and threads about how to jailbreak the latest firmware and how to downgrade to a lower firmware. If you think you can jailbreak a console just by plugging a flash drive into your PS3 than you are wrong and should definitely read this. To do this then you need to know that you have to be willing to spend some money for an E3 Flasher. This is the only working method to downgrade and jailbreak your PS3, it is also the cheapest and the easiest. This method does not require any soldering on the slim PS3, but it does require you taking your PS3 apart to get into the main board. If you have a fat PS3 then you will have to do soldering any you have a lot greater of a chance at failing at this. Also if you have the brand new "Super Slim" PS3's then just quite reading now, because an E3 Flasher will not work on them. Please do this at your own risk and I am not responsible if you get into any trouble doing this. I recommend you reading this whole thread before do anything on it.

Now when you think of jailbreaking a PS3 you may think of the days where every lobby on Modern Warfare 2 had super jump and super speed and you were De-ranked every lobby you went into. Some might miss those days, some might not. Now when you go into a lobby that is hacked, you know that person has gone through a lot to jailbreak, and keep their PS3 jailbroken. Back in the days all you needed was a computer, a PS3, and a USB drive to jailbreak a PS3 and you could be hosting hacked lobby's. Now in days you have to acquire some skills, techniques to stay jailbroken and stay safe. People that are jailbroken have either been jailbroken for years now, and every time a new update comes out they have to wait for a spoofer of some sort, or they have an E3 Flasher. They can also have more than one PS3 if they wish.
Jailbreaking is a term used widely throughout the technical community and has a bad name, even though it has a lot of good. Most people think of jailbreaking as hacking, making hacked lobby's and getting free shit, but it's not. Yeah, some people do use it for malicious activity, but a lot of people use it to customize their device they way they want it to act. People jailbreak iPhone's so they can install custom themes on it to make it look better, not only to crack apps, and get free in game bonuses. So now that you know a little bit about jailbreaking lets move into actually completing this task on your PS3.
Jailbreaking is a term used widely throughout the technical community and has a bad name, even though it has a lot of good. Most people think of jailbreaking as hacking, making hacked lobby's and getting free shit, but it's not. Yeah, some people do use it for malicious activity, but a lot of people use it to customize their device they way they want it to act. People jailbreak iPhone's so they can install custom themes on it to make it look better, not only to crack apps, and get free in game bonuses. So now that you know a little bit about jailbreaking lets move into actually completing this task on your PS3.
Jailbreak your PS3 (IF you used an E3 Flasher then do not do this.)
Step One: You need to of course be on 3.55 or below firmware.
Step Two: Now you need to get a custom firmware (CFW) from somewhere. Make sure it is compatible with the firmware that is on your PS3. Here is Geohot's CFW for 3.55: http://www.mediafire.com/?rwqbcn8rkytpfbq
Step Three: Save the CFW on your computer and get out a USB drive.
Step Four: Plug the USB drive into your computer and make a folder on it called "PS3" and inside that folder make another folder called "UPDATE" (no quotes in any of that) and put the CFW in the "Update" folder.
Step Five: Plug the USB into your PS3 and go to Settings -> System Update -> Update Via Storage Media then you should see Geohot's CFW right there.
FAQ:
Question: Can I jailbreak above 3.55?
Answer: No.
Question: Is jailbreaking a PS3 illegal?
Answer: Yes, but they are not going to hunt you down, but some people have gotten sued.
Question: Why would I want to jailbreak my PS3?
Answer: Jailbreaking gives you new options in which activity's to do with your PS3. Good and bad, you choose what you do with your jailbreak.
Question: Can my console be bricked?
Answer: Yes, if you do to much then Sony could recognize your console is jailbroken and they will brick it.
Question: Is there a way to un-brick your console?
Answer: Yes, in some cases.
Question: Can I still get online with this?
Answer: Yes. When a new update comes out do NOT update! Wait for a spoofer of some sort to make you able to go online.

How To Downgrade
Now I will show you how to downgrade your PS3 to 3.55 even if you are using the latest firmware. If you are already running 3.55 firmware then please skip this whole step. Before you do anything, you need to buy an E3 Flasher. Please be sure to read everything on that page before buying. After about a week your product should arrive and you will be able to continue with this process. Once you get it be very careful opening it up and do not mess with anything just yet.
Requirements
- E3 Flasher from here: http://www.modchipcentral.com/store/E3-Flasher-Dual-Boot-PS3-PlayStation3-Downgrader-Jailbreak.html
You should get a box like this:

Before you do anything you need to make sure you are not trying to downgrade to a firmware that your PS3 has never used. Example, if you bought your PS3 and the firmware you installed it on the very first time was 3.70, then you will NOT be able to install any other firmware lower than 3.70 on it. So if this matches you, an E3 Flasher will not work. You can check to see the lowest firmware by using the minimal downgrade check PUP file. Just rename to PS3UPDAT.PUP and place in a folder named UPDATE, then place that in a folder named PS3, and put on the root of your flash drive. Put it in the PS3 and navigate to system update. Choose update from storage device. Don't worry it won't update your ps3. It will tell you what the lowest firmware your console can go.
Here is a chart to check the firmware and nor chip compatibility:

Videos on how to install an E3 Flasher onto your PS3: (I did not make these)
To install an E3 Flasher please follow this tutorial: (For the fat PS3's)
[video=youtube]http://www.youtube.com/watch?v=w9ZnSobfYcw[/video]
To install an E3 Flasher please follow this tutorial: (For slim PS3's)
[video=youtube]http://www.youtube.com/watch?v=WHNw2E4tU6c[/video]

Step one - Download the "kmeaw" CFW, and install it the same way you would install any other custom firmware (switching to normal 3.55, then switching back to CFW): HERE (NOTE: Select the "Patched PUP" download)
Step two - Download Gaia back up manager: HERE
Step three - Install one of the PKG's in the archive. You'll notice that there are 3 different PKG's in the Gaia download. It doesn't matter which one you install, the only difference is the folder it will copy the games to on your HDD.
Step four - Put any game into your PS3 and in Gaia, find it and press "O" to copy it to your HDD.
Step five - After it's done, you can take the disc out of your PS3, or leave it in. It's up to you. Select the version of the game that was copied to your HDD, and press "L1."
Step six - Press "X" and it should bring you to the XMB.
Step seven - Go to "PS3/HDD_GAMES/" or something like that under "GAME" and press "X."
The game should now start, and that's how you get working backups for ANY game.
Please look to the next post for credits.

- Bullet(Czch) - Writer
- Pure - Thanks for the GFX
- The user who made the YouTube video on 'How to open and Xbox 360'
- Some friends of mine from another site (GT, He is also from TTG) that kindly, provided me with pictures, and some info.
- Motherboard Information (Friend from TTG, iPatobo)
- I got the PS3 info from HF. http://www.hackforums.net/showthread.php?tid=2979749
If you guys have any questions please post on this thread instead of PMing me. If you PM me I will just tell you to post here.
I posted this on HF, I am not stealing anyone's work.
Also, change theme to black to read the thread easier.

